Avoid 3cm Drift: Slat Wall Panel Installation for UK DIYers
Install slat wall panels by setting a level ledger line first, then fastening each panel through its screw flange into wall studs with the correct screws, trimming cleanly around sockets as you go. Adhesive can back up the mechanical fixings on drywall, but it should never be the only thing holding a panel up. Get the first panel dead level and everything after it falls into place.
TL;DR:
- Proper leveling and fixing into wall studs are critical, with the first panel perfectly aligned to prevent visible drift across the wall.
- Cutting panels face down with a fine-tooth blade ensures clean edges, especially around sockets, with masking tape reducing splintering.
- Screws should be driven through the panel flange directly into studs, spaced every 12 to 16 inches, with adhesive used only as a secondary bond.
- Marking socket positions accurately and testing cuts before fixing prevents fitting issues and allows for neat, flush outlets.
- The main cause of failure is poor prep, particularly neglecting the ledger and stud alignment, not panel quality or adhesive reliance.
Table of Contents
- Slat wall panel installation: what you need before you start
- How do you plan and mark out a slat wall panel setup?
- What is the best way to cut slat wall panels cleanly?
- How do you attach slat wall panels securely?
- How do you work around sockets and trims neatly?
- Finishing checks and keeping panels looking good
- Why the publisher’s support matters for a first-time install
- Why most slat wall failures aren’t about the panel at all
- Ready to start? Order samples and get fitting support
- Manufacturer guides worth checking before you fit
- Sources
- FAQ
Slat wall panel installation: what you need before you start
Good slat wall panel installation depends on having the right kit ready, not improvising halfway through a cut. You need a few tools you probably already own, and a few you should borrow or buy.
- Measuring and marking: tape measure, spirit level (a laser level speeds up long runs), stud finder, pencil, chalk line for the ledger.
- Cutting: circular saw with a fine-tooth blade for straight runs, jigsaw with a medium-tooth blade for socket cut-outs, a fine-tooth handsaw as a backup.
- Fastening: cordless drill/driver, pilot-hole drill bit, spirit level again (you’ll use it constantly), a set of clamps or a straight edge for guiding cuts.
- Fixings: self-tapping screws for timber studs, and self-drilling screws for metal studs; construction adhesive as a secondary bond on drywall or tile-backed walls.
- PPE: safety glasses, ear defenders for power tools, a dust mask when cutting engineered timber.
Cuts go wrong, and you don’t want to wait on a reorder mid-job. For starter stock, the Signature Wide Slat Black panel, the Ultra Low Cost Black Acoustic Wall Panel, and the Signature Wide Slat Grey panel all suit a first-time DIY install.
Pro Tip: Keep one spare blade for each saw in your kit bag. A dull blade is the single biggest cause of chipped edges on slat panels, and swapping mid-job costs less time than sanding out tear-out afterwards.
How do you plan and mark out a slat wall panel setup?
Measure the full wall width and height first, then work out how many panels you need and where seams will fall. This is where most DIY jobs go wrong, and it happens before a single screw goes in.
- Find and mark every stud. Use a stud finder and mark centre lines with a pencil, running the marks up past where the panels will sit so you can still see them once panels go up.
- Set a temporary ledger. Fix a straight batten along a level line near the bottom of the wall, checked with a spirit level, not just eyeballed. This ledger carries the weight of the first row while you fix it and stops any tilt creeping in.
- Plan your seams onto studs. Panels should start and finish on a stud wherever possible; where they don’t line up, add a timber nailer behind the joint for a solid fixing point.
- Check for masonry. On block or brick walls, fix timber furring strips to the masonry first, then fasten panels to those strips rather than directly into the wall.
A ledger board is not optional advice so much as the mechanism that prevents an accumulated lean across a whole run of panels. Get the first one wrong by even a few millimetres and by panel six or seven, the drift is visible from across the room.
What is the best way to cut slat wall panels cleanly?
Cut with the panel’s decorative face down when using a circular saw, and face up if you’re on a table saw. This single detail decides whether your edges come out crisp or chewed up, because the blade exits through whichever face is underneath.
- Run a strip of masking tape along the cut line on the visible face to reduce splintering.
- Use a straight edge or guide rail clamped to the panel for any cut longer than 30cm.
- For socket and switch cut-outs, transfer the box position onto the panel, drill a starter hole in two opposite corners, then cut with a jigsaw and a medium-tooth blade, supporting the panel underneath to stop vibration chipping.
- Finish exposed edges with corner trims or joint inserts rather than leaving raw cut edges on show, especially at external corners and around door reveals.
Fine-tooth blades matter more on slat panels than on plain plasterboard, since the grooves and any veneer finish show every stray tooth mark.
How do you attach slat wall panels securely?
Drive screws through the panel’s screw flange straight into the stud behind it, not just into the drywall skin. This is the fixing method manufacturers specify for a reason: drywall alone will not hold a loaded shelf bracket for long.
- Fasten every 12 to 16 inches (roughly 30 to 40cm) along each stud, following the panel manufacturer’s own spacing guidance where it differs.
- Pre-drill pilot holes, especially where a panel has a metal insert or aluminium trim, to stop splitting around the fixing point.
- Use self-tapping screws for timber studs and self-drilling screws for metal stud frames.
- Don’t over-tighten. Leave screw heads slightly recessed so nothing protrudes into the groove, and allow the panel a little room to move as timber expands and contracts with humidity.
- Add construction adhesive as a secondary bond on drywall or tile-backed sections, but never rely on adhesive alone anywhere a heavy item will hang.
Pro Tip: Where you know a shelf or television bracket will land, add a timber blocking strip behind the panel at that point before you fix it. Retrofitting a fixing point after the wall is finished means cutting back into work you’ve already completed.
Heavier loads always need a direct stud fixing or blocking behind the panel, not a reliance on the panel skin or adhesive to carry the weight.
How do you work around sockets and trims neatly?
Mark every socket and switch position on the panel before you lift it into place, working from measurements taken off the existing wall rather than guessing.
- Drill starter holes at opposite corners of the cut-out, then cut with a jigsaw, checking fit against the box before final fixing.
- Use box extenders where the panel’s thickness sets the socket back further than the existing faceplate can reach.
- Keep screws well clear of the box edges to avoid catching cables or terminals behind the wall.
- Finish with corner trims and joint inserts around window and door reveals for a clean, continuous line.
Test-fit every cut-out before final fixing. It’s far easier to trim a few extra millimetres off a panel edge than to unscrew a fully fixed panel to fix a socket that won’t seat properly.
Finishing checks and keeping panels looking good
Run a level along the top and bottom of the finished wall before you call the job done, checking that grooves line up continuously from panel to panel and that no seam has crept out of line.
- Fit groove inserts and edge trims, wiping away any adhesive squeeze-out while it’s still workable.
- Trial-hang your heaviest planned accessory on a stud-fixed point first, before committing to lighter fixings elsewhere on the run.
- Wipe panels down with a dry or slightly damp cloth; avoid harsh solvents that can dull a finish or affect an acoustic surface.
- Check fixings annually if the wall carries hung items, since seasonal humidity shifts can loosen a screw that was fitted too tight originally.
Pro Tip: Always test heavy accessories on a stud-mounted point first. A bracket that looks secure in a drywall-only fixing can work loose within weeks under real weight.
Why the publisher’s support matters for a first-time install
Thepanelandpapercompany builds its panel range around noise reduction and interior finish for homes and commercial spaces across London and the surrounding areas, and that focus shapes how the panels are specified for DIY fitting.
- Panels are offered in a wide range of styles and finishes at accessible prices, so a first project doesn’t need a large upfront outlay.
- Quick questions during a fit get answered over WhatsApp support rather than a call centre queue, which matters when you’re standing halfway up a wall with a drill in one hand.
- Every panel carries a one-year warranty, which covers you if something about the product itself falls short.
- A beginner-friendly step-by-step guide walks through a faster install for readers who want a shorter, more visual version of this process.
- Delivery logistics have been worked out for flats and upper-floor properties, which matters more than people expect when a set of 240cm panels needs to get up a narrow staircase intact.
Why most slat wall failures aren’t about the panel at all
Most complaints about slat wall panels sagging, tilting, or pulling away from the wall trace back to one of two mistakes: skipping the ledger, or trusting adhesive to do a screw’s job. Neither failure is really about panel quality. It’s about sequence.
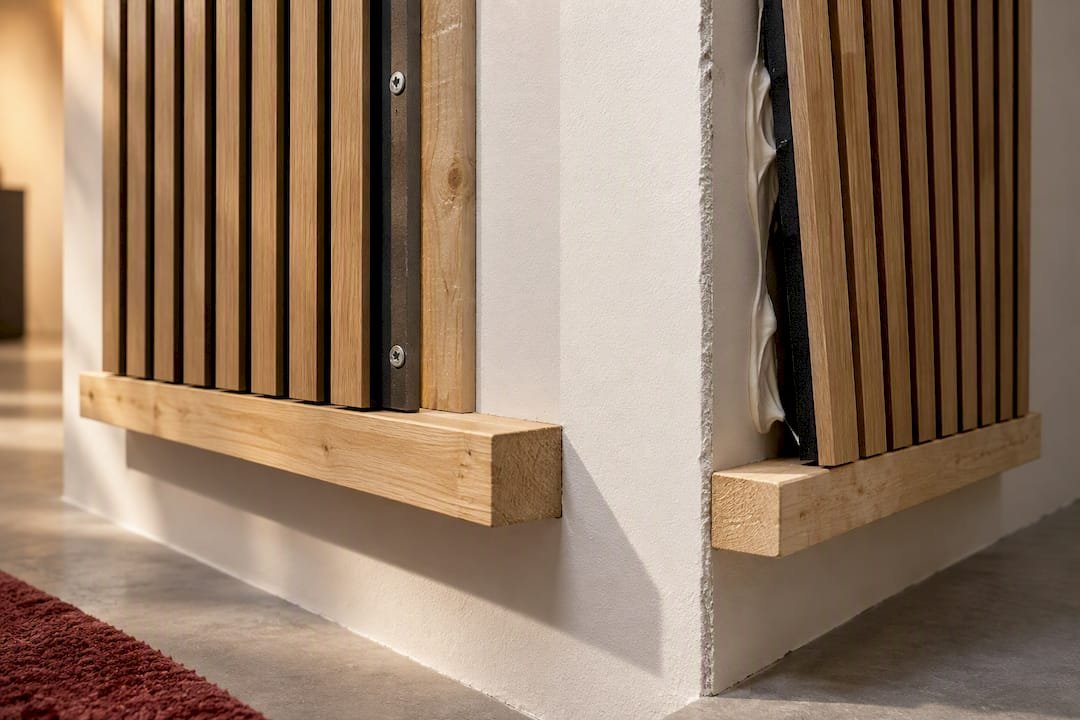
The conventional DIY advice online tends to rush the prep and linger on the glamorous bit, the actual mounting. That’s backwards. The genuinely hard part of a slat wall panel install is the first thirty minutes: finding studs accurately, striking a truly level line, and resisting the urge to eyeball it because the panel “looks straight enough.” Every seasoned fitter knows a wall that’s out by 3mm at the bottom is out by 3cm by the time you’ve climbed to the top.
If you take one thing from this, prioritise the ledger over the cut. A slightly rough cut hides behind a trim. A wall that leans doesn’t hide behind anything. Get that first panel level, fix into studs properly, and treat adhesive as backup rather than a shortcut, and the rest of the job is largely repetition.
— Tayyy
Ready to start? Order samples and get fitting support
Thepanelandpapercompany gives you an easier starting point than sourcing panels, trims, and fixings separately from three different suppliers, because everything is specified to work together from the first screw. For a first slat wall project, the Signature Wide Slat Black panel and the Signature Wide Slat Grey panel both come in the 240cm x 30cm set of two with a three-sided wrap finish that hides raw cut edges neatly at corners.

If budget is the priority, the Ultra Low Cost Black Acoustic Wall Panel gets you into acoustic slat panelling without the premium finish cost. Not sure which finish suits your room yet? Order a sample first through the shop page before committing to a full wall. And if you hit a snag mid-install, whether that’s a stud that won’t align or a socket cut-out that’s not quite right, message the WhatsApp support line for a quick answer rather than guessing your way through it. Check the one-year warranty terms on the product page before you buy, so you know exactly what’s covered if anything about the panel itself isn’t right.
Manufacturer guides worth checking before you fit
- Slatwall installation instructions for exact screw spacing and fixing methods.
- Trusscore slatwall installation guide for stud-alignment and masonry furring detail.
- Timbertune technical datasheet for acclimatisation and finish handling.
Sources
- Slatwall installation instructions (manufacturer PDF)
- Trusscore slatwall installation guide
- Slatwall panel installation instructions (Dakota Panel)
- Timbertune slat panels technical datasheet
FAQ
How do you attach slat wall panels?
Fasten each panel through its screw flange straight into the wall studs behind it, using the spacing manufacturers recommend, roughly every 12 to 16 inches. Adhesive can add a secondary bond on drywall, but it should never be the sole fixing for a panel carrying shelves or brackets.
Are slatwall panels easy to install?
Yes, for a confident DIYer with the right tools, though the difficulty sits almost entirely in the prep rather than the fixing. Getting the first panel level on a proper ledger line takes patience, but once that’s set, each following panel fixes the same way in sequence.
How do I install slatwall panels around sockets?
Mark the socket position on the panel, drill starter holes at opposite corners, and cut the opening with a jigsaw before final fixing. Test the panel fits over the box cleanly, using a box extender if the panel’s thickness sets the socket too far back, before you screw it permanently into place.
Should you nail or glue slat wall panelling?
Screw the panels into studs through their flange; that’s the fixing method manufacturer guides specify for load-bearing security. Adhesive works as a secondary bond on solid backgrounds like drywall or tile, used alongside mechanical fixings rather than in place of them, especially wherever heavy items will eventually hang.
What does slat wall panel installation cost with Thepanelandpapercompany?
Prices vary by finish and pack size, and current listings are available on the product pages, including the Signature Wide Slat Black and Grey sets. Ordering a sample first through the shop lets you check finish and quality before committing to a full wall quantity.
Recommended
- How to Install Wall Panels | Beginner Guide
- How to Fit Acoustic Wall Panels UK | Installation Guide
- How to Choose the Right Wall Panel | UK Guide
Written with BabyLoveGrowth, an AI SEO writer
Ready to compare products? Shop premium wide slat wall panels Shop acoustic wall panels