Mounting Acoustic Panels on Plaster: A Step-by-Step Guide
You can mount acoustic panels on a plastered wall with construction adhesive, with screws and fixings, or with a combination of both. The right choice depends on what is behind the plaster (brick, block or a hollow plasterboard stud wall), how heavy the panels are and whether you may ever want them off again. This guide takes you through identifying your wall, preparing it, choosing a fixing, marking out, working round sockets and finishing neatly.
TL;DR
- First find out what is behind the plaster. Solid masonry takes plugs and screws well. Plasterboard on studs needs the panels fixed into the timber, or fixings designed for hollow walls.
- The surface must be clean, dry, sound and dust-free. Flaking plaster or loose old paint will let go long before the panel does.
- Mark out with a spirit level and a detector before you drill. Never drill blindly near sockets, switches, pipes or cables.
- Order a sample first. A few pounds tells you more about colour and finish than any photo.
- Lightweight slatted panels are usually easy for a competent DIYer. Anything heavy, or any wall you suspect contains asbestos, deserves a professional.
Table of Contents
- First, work out what your wall is made of
- Decide between adhesive, screws or both
- Prepare the wall
- Plan the layout before you mark anything
- Step-by-step: fitting the panels
- Working round sockets, switches and other obstacles
- Do acoustic panels soundproof a room?
- Our perspective: fix to the wall you actually have
- Choosing panels that suit a plastered wall
- Ready to fit? Start with a sample
- Common mistakes to avoid
- FAQ
- Sources
First, work out what your wall is made of
“Plaster” covers several different constructions, and each one behaves differently when you drill or stick things to it.
- Wet plaster on brick or block. Common in older British homes. Solid, dense and good at holding plugs.
- Plasterboard on a timber or metal stud frame. Typical in newer builds and in partition walls. The board is only about a centimetre thick or so, with a void behind it.
- Plasterboard dot-and-dabbed to masonry. Boards stuck to a solid wall with blobs of adhesive, leaving a small gap behind. These sound hollow when tapped but are backed by brick or block.
Tapping is the first test. Reno advises that a solid wall usually sounds dull when knocked, while a stud wall sounds hollow, and that a wall which flexes slightly under a push is another sign of stud construction. Remember that a dot-and-dab wall can sound hollow too, so tapping alone does not settle it.
The second test is a detector. Homebuilding, quoting drilling specialists, recommends tapping first and then using a digital detector to identify studs, pipes and cables before you drill. It also warns against drilling blindly near sockets, switches or plumbing. The same article explains that plasterboard differs materially from brick or concrete, which is why you must know the substrate before you choose a method.
A third, definitive test: switch off the power to the circuit, remove a socket faceplate and look at the edge of the opening. You will see whether the wall is plasterboard on a frame, plasterboard on dabs, or plaster straight on masonry.
A note on older buildings
If your home was built before the year 2000, and you find textured coatings, old ceiling or partition boards or anything you suspect might contain asbestos, stop before drilling. The HSE’s guidance on drilling holes in asbestos insulating board describes dust suppression and protective equipment for non-licensed work, including using a manual drill or a powered drill at its lowest speed and containing dust with paste or foam, or a drill cowl and a Class H vacuum cleaner. If you are not certain what you have, do not guess. Have it identified by a qualified surveyor first.
Decide between adhesive, screws or both
There is no single best method. Match the fixing to the wall and to the panel.
| Method | Best for | Watch out for |
|---|---|---|
| Construction adhesive only | Flat, sound, painted or bare plaster; light to medium panels; renters or anyone avoiding holes | Needs a clean, dry surface and full curing time; removal can tear the plaster face |
| Screws into studs | Plasterboard on timber studs; heavier panels | You must locate the studs accurately; screw spacing has to match the panel |
| Screws and plugs into masonry | Plaster on brick or block | Dust, hidden cables, and filling holes if you remove the panels later |
| Hollow-wall or bridging fixings | Plasterboard with a cavity, dot-and-dab walls | Choose the type to match the gap and the load |
| Adhesive plus a few screws | Larger runs, heavier panels, public spaces | Takes longer but gives the most secure result |
For very heavy loads on plasterboard, the Free Trade Calculator fixings guide advises fixing through the board into a timber stud or using a mounting board. Acoustic panels are rarely that heavy, but a run of 2.4 m panels adds up, so treat the wall as carrying a real load.
On dot-and-dab walls, fixings designed to bridge the gap help. Fischer says its dot-and-dab fixing spans the space behind the plasterboard so the board is not dented, and spreads the load into the substrate. That is the principle to look for: the fixing should pass the load into something solid rather than leaving it hanging from thin board alone.
Why not rely on plasterboard alone?
Plasterboard crushes and crumbles around a plug. A panel hung from a standard plastic plug in the board alone may hold for weeks, then sag. Locating timber behind the board is safer; Corefix suggests using a stud finder to find timber frames and treating them as the secure anchor point for heavier items, in preference to the board surface alone.
Prepare the wall
Good preparation matters more than the brand of adhesive.
- Check for damp. A cold, stained or powdery wall will not hold adhesive and will damp-stain the back of any panel. Fix the cause first.
- Remove anything loose. Tap the plaster. Hollow, drummy patches or flaking skim should be cut back and repaired. If you are stripping off a lot of failed plaster, plan the clear-up in advance; a plaster waste disposal service is one way to see how contractors handle heavy debris, though in the UK you should use a local licensed carrier or your council’s waste site.
- Fill and sand. Fill dents and cracks, let the filler dry and sand it flush.
- Clean. Wipe away dust, grease and cooking residue. Kitchens and dining spaces need extra care.
- Deal with fresh paint. Wait until new paint or plaster has fully cured, which can take weeks for new skim, before bonding anything to it.
- Seal very dusty or powdery surfaces. A suitable primer gives adhesive something stable to grip.
- Let the panels acclimatise. Leave wood-effect panels in the room for a day or so before fitting, so they settle to the same temperature and humidity.
Plan the layout before you mark anything
Sketch the wall with measurements. Decide:
- Which direction the slats run. Vertical lines make a ceiling feel taller. Horizontal lines widen a room.
- Where the panels start. Begin from the centre of a feature wall, or from a corner, so that any cut panel ends up in the least visible place.
- Where the obstacles are. Sockets, switches, radiators, light fittings and skirting boards.
- Where the sound actually bounces. Panels do most good on the walls facing each other or behind the main listening or speaking position. Our guide to panels behind your desk shows how that works in a home office.
Lay a few panels on the floor in the pattern you plan. It takes ten minutes and saves expensive mistakes.
Step-by-step: fitting the panels
Tools you will probably need
Tape measure, pencil, spirit level, stud and cable detector, drill and bits, screwdriver, a fine-toothed saw or mitre saw for cutting, a sealant or adhesive gun if you are bonding, dust sheets, and safety glasses and a dust mask.
The process
- Switch off the power to circuits on the wall you are working on if you will be near any socket or switch.
- Mark a level starting line. Use a spirit level. Floors and ceilings are rarely true, so do not trust them as a reference.
- Scan and mark. Run the detector over the area and pencil the position of studs, pipes and cables. Keep every fixing point away from those lines unless you are deliberately fixing into a timber stud.
- Dry-fit the first panel. Offer it up and check the line against the level.
- Apply adhesive, or pre-drill. For adhesive, run beads in vertical or zig-zag lines according to the adhesive maker’s instructions, leaving gaps so air can escape. For screws, pre-drill the panel and the wall, using the right plug for masonry or fixing into the stud for plasterboard.
- Press the panel into position and check level again before the adhesive grabs. Support it with temporary props or tape if the adhesive needs time.
- Fit the next panel against the first, checking the joint line and the slat spacing continues without a visible jump.
- Cut where needed. Cut at the back with a fine-toothed blade to reduce chipping, and test the cut piece before fixing.
- Finish edges. Use trim, a colour-matched sealant or a neat gap at skirting and ceilings, depending on the look you want.
Keep screws visible or hidden?
On slatted wood-effect panels, screws can often be placed in the grooves between slats and will not be seen. On flat sheets, countersink and fill, or use adhesive for the face and screws only at the edges where trim will cover them.
Working round sockets, switches and other obstacles
Sockets are where most DIY installs look rough. A few rules help.
- Isolate the power first, then unscrew the faceplate.
- Cut the panel opening slightly smaller than the socket back box, so the faceplate overlaps the edge and hides the cut.
- Use longer faceplate screws or box extenders so the socket sits proud of the new panel face. The first ranking video guide mentions this exact trick: cut the opening smaller and use longer screws so the faceplate sits on the panel’s face. If the new surface is thick, a box extension may be required so the fitting remains safe and compliant. Ask a qualified electrician if you are unsure.
- Do not cover a socket or switch with a panel. Leave access clear.
- Keep panels away from heat. Leave a suitable gap around radiators, flues and downlights. Do not put panels where they could trap heat.
- Radiator pipes and skirting. Notch the panel neatly, or stop it above the skirting and let the skirting stay as a visual base.
For fixed light features, our LED light kits and wall panel accessories can help finish the look. Check the shop for current options.
Do acoustic panels soundproof a room?
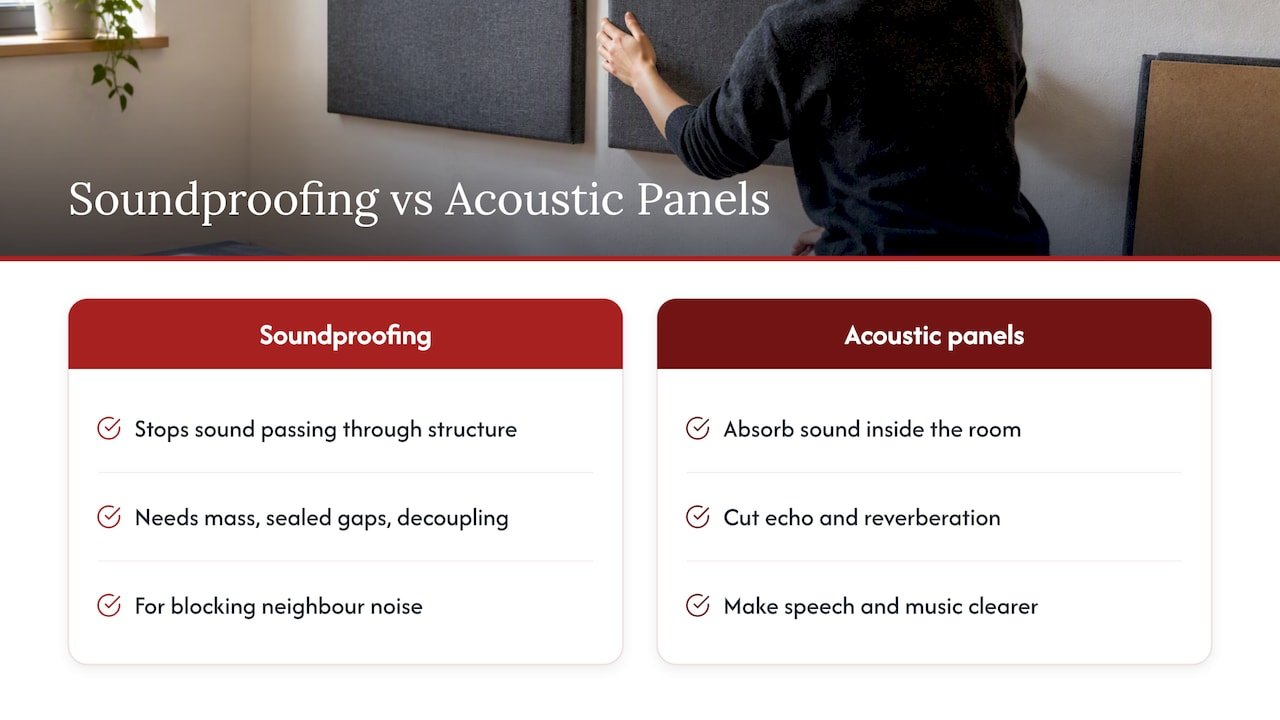
Not in the sense most people hope. Soundproofing means stopping sound passing through a wall, floor or ceiling, which usually needs mass, sealed gaps and decoupled construction. Acoustic panels absorb sound inside the room, which cuts echo and reverberation and makes speech and music clearer. A noisy neighbour on the other side of a party wall will still be heard, though the room can feel calmer and less echoey.
So set your expectation to match the goal. If you want a restaurant, home office, living room or hall to sound less harsh, panels are the right tool. If you need to block a neighbour’s noise, treat the structure first and use panels on top. For what really changes after fitting, see acoustic panels before and after. If you are a landlord or developer worrying about regulations between dwellings, our summary of Part E sound insulation explains what the rules cover.
Our perspective: fix to the wall you actually have
Most installation problems we hear about start the same way: someone chose a method before finding out what the wall was made of. A panel that is stuck to flaking plaster, or hung from board alone, is not a bad panel, it is a bad fixing.
Our advice is simple. Spend ten minutes finding out what is behind the surface. Spend another twenty preparing it. Order a sample, which starts from £3.00, and hold it against the wall in daylight and evening light before you commit to a full order. If a wall looks awkward, ask us on WhatsApp before you buy and we will help you think it through.
We design our panels to suit people who want a good-looking result at an accessible price, including first-time fitters. That does not remove the need for care. Take your time with the marking out and the sockets, and the finish takes care of itself.
— Tayyy
Choosing panels that suit a plastered wall
For most homes, the easiest start is a standard 240 x 60 cm slatted panel. Our acoustic wall panels come in Black Oak, Dark Oak, Grey, Walnut and White Oak at £29.99 each. If budget is the main concern, the ultra low cost range is £22.99 per panel. For curved walls and columns, take a look at our flexible wood wall panels, from £166.80 per set of 2. For a bolder, wider look, our premium wide slat panels start at £53.99 per set of 2. For a realistic idea of total spend, our guide to acoustic panel cost in the UK breaks it down.
All our panels carry a one-year warranty.
Ready to fit? Start with a sample
If you are still deciding on colour or finish, a sample costs from £3.00 and lets you check how the tone looks against your plaster and lighting. When you know what you want, choose your panels from the full acoustic wall panel range and message us on WhatsApp if you want a second opinion on your wall.

We deliver across the UK and serve London and the surrounding areas, so most customers can have panels on their wall within days of ordering.
Common mistakes to avoid
- Drilling before scanning. Cables run vertically and horizontally from sockets and switches, often in predictable lines.
- Fixing into board only. Fine for the lightest items, risky for a run of panels.
- Gluing onto dusty or freshly painted walls. The adhesive bonds to the dust, not the wall.
- Starting from the floor or ceiling line. Use a level instead.
- Forgetting what removal costs. Adhesive on plaster may pull the skim coat off. If you rent or might change your mind, use fewer bonded points and more mechanical fixings, or ask your landlord first.
- Ignoring the acoustics. Cover a meaningful share of the reflective surfaces. A single panel will look good but do little.
FAQ
Can I glue acoustic panels straight onto plaster?
Yes, if the plaster is sound, dry, clean and not crumbling. Use a construction adhesive suited to wood-based panels and the wall, and follow the adhesive maker’s instructions on spacing and curing time. For long panels or busy spaces, add a few screws for peace of mind.
How do I mount acoustic panels on plasterboard?
Find the timber or metal studs with a detector and fix through the panel into them where you can. Where you cannot hit a stud, use adhesive or a fixing made for plasterboard. Heavier loads should always go into a stud or a mounting board.
Will mounting panels damage my plaster?
Screws leave holes you can fill and repaint. Adhesive is harder to reverse and can pull away the paint or skim when panels are removed. If you may want to undo the job, use mechanical fixings and keep adhesive to a minimum.
Do I need to remove wallpaper first?
In most cases, yes. Wallpaper can peel, stretch or bubble under the weight of a panel and adhesive, and it gives a poor bond. Strip it, fill any marks and prepare the plaster beneath.
Can I fit panels myself?
For light slatted panels on a sound wall, most competent DIYers can. Call a professional if you find hidden cables you cannot trace, a suspicious old board that could contain asbestos, damp, or if you are covering a very large area.
Sources
- Expert tips for drilling into walls safely and successfully, Homebuilding
- How do I tell if my wall is solid or stud? Reno
- Drilling holes in asbestos, HSE
- Fixings Reference Guide, Free Trade Calculator
- 5 Tips For Finding The Right Wall Fixing, Corefix
- fischer Dot and Dab fixing DDF 10 x 100 FUS K
Recommended
- Acoustic Panels Before and After: What Really Changes
- Acoustic Panel Cost in the UK: What You’ll Really Pay
- Call Center Acoustics: Try Layout Before Buying Panels in t…
- Panels Behind Your Desk: What Works and How to Fit Them
Ready to compare products? Shop flexible wood wall panels Shop premium wide slat wall panels