First Reflection Points: Mirror Test, Then Verify With REW

First reflection points are the surface locations where loudspeaker sound first bounces to your ears, usually on the side walls, ceiling, desk and rear wall. Find them with a simple mirror trick, then treat each spot with broadband absorbers or a ceiling cloud. Once panels are up, verify the result with a measurement tool for reliable confirmation rather than relying solely on your ears.
TL;DR:
- Use a mirror to mark reflection points, then measure each speaker separately; early left and right traces should match within roughly 2 dB.
- Treat reflection peaks above −10 dB as problematic, and aim for reflected energy below −15 dB by 15 to 20 milliseconds.
- Use broadband absorbers rather than diffusers at first reflection points; 2 to 4 inch panels suit walls and ceilings, while small rooms often need a ceiling cloud.
- Desk reflections can cause comb filtering from 1 to 4 kHz; a monitor tilt and thin absorber between speakers and keyboard can reduce it.
- Speaker boundary interference creates cancellation around 100 to 300 Hz, so side wall panels will not solve it; move speakers, flush mount them, or add bass trapping.
Table of Contents
- Why first reflections distort imaging and tonal balance
- How to find first reflection points with the mirror trick
- How to measure and verify reflections before committing to treatment
- How to treat first reflection points once you have found them
- Getting panel size and speaker placement right
- Finding first reflection points in different room types
- How furniture and layout change your reflection points and results
- Absorption versus diffusion at the first reflection point
- Budgeting for first reflection treatment at home or in a studio
- What installations actually reveal about reflection treatment
- Which panels suit side wall, ceiling and desk treatment
- FAQ
- Sources
Why first reflections distort imaging and tonal balance
A first reflection is the earliest sound to bounce off a room surface and reach your ears shortly after the direct sound from the speaker. Because your hearing fuses closely-timed arrivals together, a reflection in the first 0 to 10 milliseconds gets integrated with the direct sound and can smear the stereo image, an effect tied to the Haas, or precedence, effect. Reflections arriving within 20 milliseconds still shape tonal balance and can introduce comb filtering, where peaks and dips in the frequency response come from the reflected copy cancelling or reinforcing the direct sound at different frequencies.
The practical targets are specific: reflection peaks above −10 dB are considered problematic, and the aim is to get reflected energy below −15 dB by the 15 to 20 millisecond mark.
The surfaces that typically throw a first reflection at your listening position are:
- The side walls, roughly level with each speaker.
- The ceiling directly above the midpoint between you and each speaker.
- The desk or console surface in front of the speakers.
- The rear wall behind your listening chair.
- The floor, particularly in rooms without carpet or rugs.
How to find first reflection points with the mirror trick
The fastest way to locate a first reflection point is the mirror trick, which works because it mimics the image-source method used by acoustic modelling software: every first-order reflection in a rectangular room can be found by tracing the geometric reflection path, and a mirror makes that path visible.
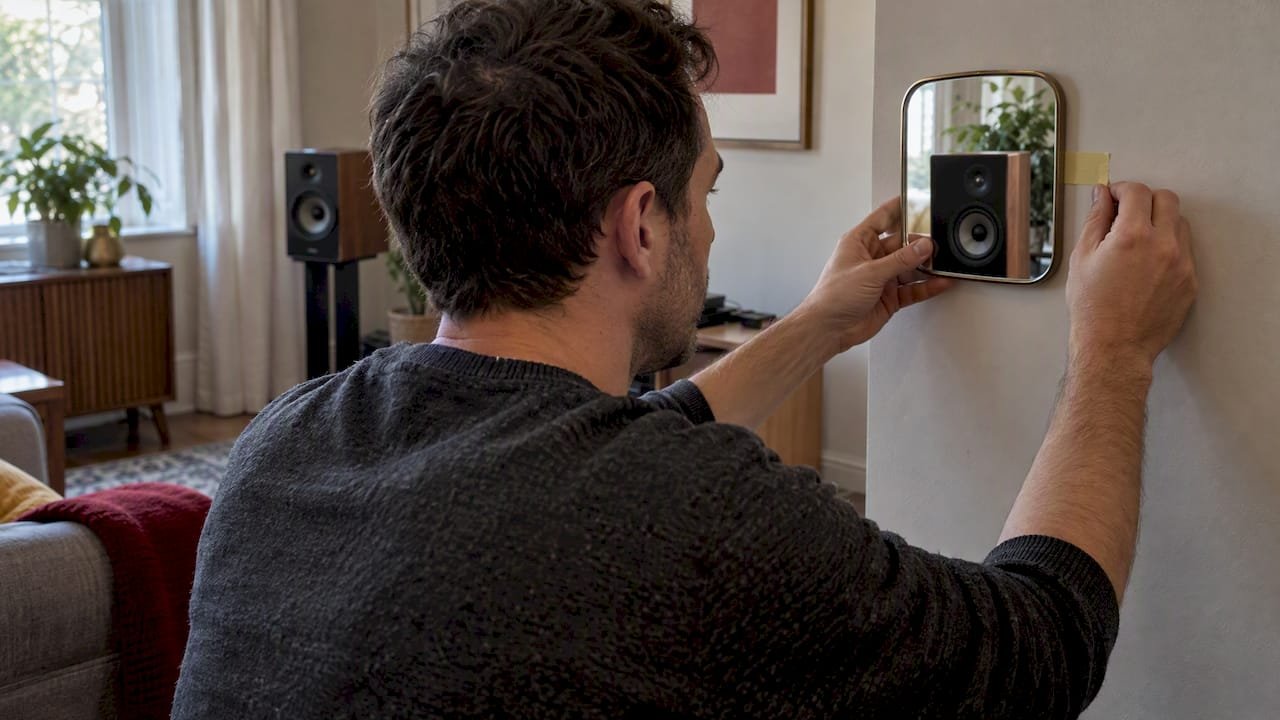
- Sit in your normal listening position and have someone slide a mirror along the side wall between you and the left speaker.
- Mark the spot on the wall where you can see the speaker’s driver reflected in the mirror; that is your first reflection point.
- Repeat on the right wall, matching the position for symmetry.
- Slide the mirror across the ceiling between you and each speaker to find the ceiling reflection point.
- Check the rear wall behind your seat the same way, using the mirror angled back towards each speaker.
- If you work alone, prop the mirror on a stand or tape it in place and check the reflection from your seat before moving it.
For the desk, hold a small mirror flat on the surface between the speaker and your ears; if you see the driver, that spot needs treatment too. A helper speeds this up considerably on ceilings and rear walls, where holding the mirror and checking the angle from your seat at the same time is awkward alone.
Pro Tip: Mark each point with a small piece of tape rather than committing to panel placement straight away. You will want to confirm it with measurement before fixing anything permanently.
How to measure and verify reflections before committing to treatment
The mirror trick tells you where a reflection happens, but not how much it matters. Confirming that takes a measurement rig and a few minutes per speaker.
- Place the microphone at ear height, centred on your listening position, and keep it still between speaker measurements.
- Measure each speaker separately rather than both at once, so you can see each reflection pattern clearly.
- Use a measurement platform such as Room EQ Wizard to capture an Energy Time Curve, or ETC, and save each trace so you can compare before and after treatment.
Reflections within the first 10 milliseconds deserve the closest attention, though it is worth inspecting the full 0 to 40 millisecond window for anything unusual further out.
Three numbers to watch for:
- No reflection peak should sit above −10 dB relative to the direct sound.
- Reflected energy should fall below −15 dB by the 15 to 20 millisecond mark.
- Left and right traces should match within roughly 2 dB in the early window, since asymmetry between the two channels undermines a stable centre image even when each side looks fine on its own.
If a marked point shows a clean trace already, it may not need treatment. If it shows a sharp peak inside that early window, that is where a panel goes next.
How to treat first reflection points once you have found them
Absorption is the correct starting treatment at a first reflection point, not diffusion. A diffuser scatters the reflection in time and direction rather than removing its energy, which still leaves content arriving inside that critical 10 to 20 millisecond window, just spread out instead of concentrated. Broadband absorption actually removes the problem.
The ceiling is often the strongest first reflection in a small room, simply because it tends to be the closest surface to the direct path between speaker and ears, which is why a ceiling cloud is frequently necessary rather than optional. A single, well-placed cloud covering the mirror-trick area usually beats several smaller patches scattered nearby.
Desk reflections are easy to miss but can produce noticeable comb filtering in the 1 to 4 kHz range, right where vocal detail and cymbal clarity live. Tilting the monitors back slightly and adding a thin absorber panel between the monitors and your keyboard often resolves this without any major redesign.
For material choice, 2 to 4 inch rigid fibreglass panels are a reliable starting point at side wall and ceiling points, and a 4 inch panel mounted with an air gap behind it extends the absorption further down into the low-mid range.
- Side wall and ceiling points: broadband absorber, 2 to 4 inches thick.
- Desk reflections: thin absorber plus a slight monitor tilt.
- Rear wall: broadband absorber if the space is used for critical listening rather than background sound.
Pro Tip: Treat before you diffuse. Diffusion has a role later in the room, once the early reflections are under control, not as a substitute for absorption at the first reflection point itself.
Getting panel size and speaker placement right
Panel size matters as much as panel placement. For full side wall or ceiling coverage of a first reflection point, a panel around 240 by 60 centimetres gives enough surface area to catch the whole reflected image, while a 120 by 60 centimetre panel works for narrower walls or where two smaller panels suit the layout better. Anything smaller than roughly 60 by 30 centimetres tends to miss part of the reflection, especially on wider speaker spacings.
Centre each absorber at tweeter or ear height, not at a convenient shelf height, and match the left and right placements exactly so the room stays symmetrical.
- Measure panel centre height from the floor to your tweeters, then mount both side panels at that same height.
- Keep left and right panel sizes and positions identical; asymmetry here undoes the symmetry you worked for in measurement.
- Avoid substituting a diffuser for an absorber at the first reflection point itself.
- Do not skip the ceiling or desk points because they are harder to reach; they are frequently the strongest reflections in the room.
Speaker-to-wall distance introduces a separate issue called speaker boundary interference response, or SBIR. A speaker sitting proud of the wall by only a short distance can create a reflection arriving in under 2 milliseconds, producing a cancellation notch somewhere around 100 to 300 Hz. No side wall panel fixes this, because it is a low-frequency phase phenomenon rather than a reflected-energy problem. The practical fixes are flush-mounting the speaker, pulling it further into the room, or managing the low end separately with bass trapping.
Finding first reflection points in different room types
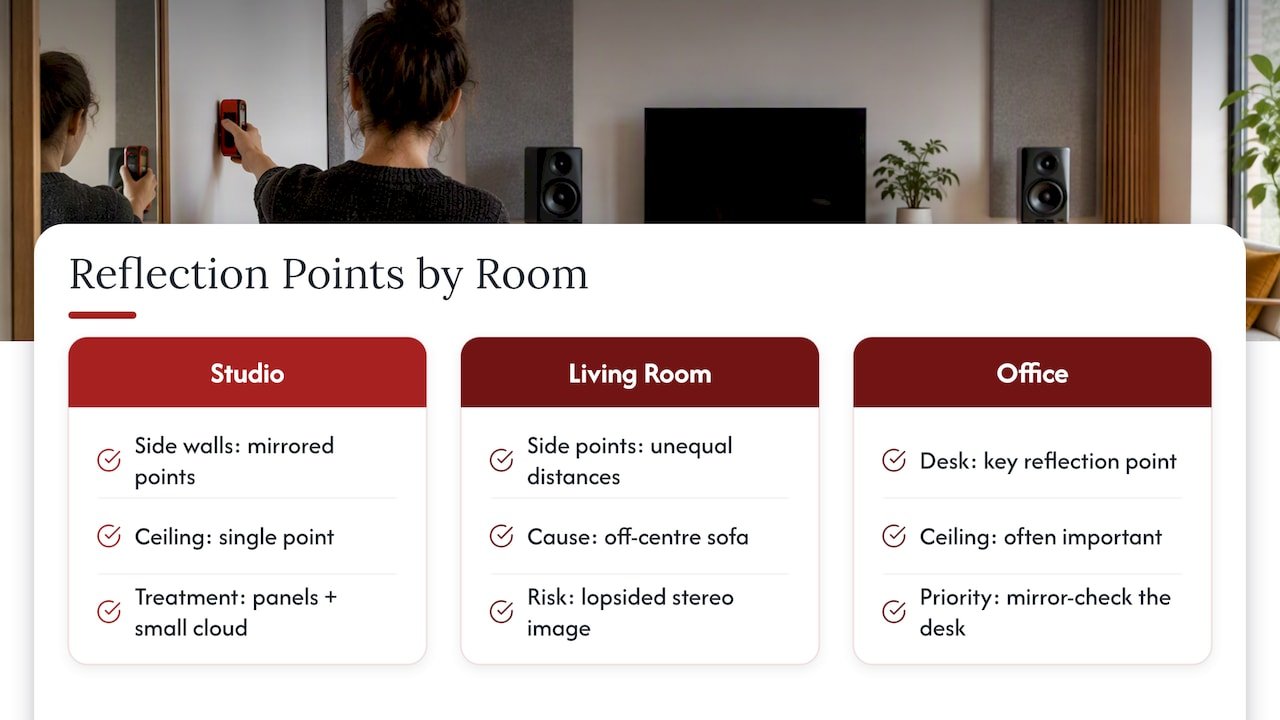
A dedicated home studio with symmetrical speaker placement and a near-field monitoring position is the easiest case: the mirror trick produces clean, mirrored points on both side walls and a single ceiling point, and treatment is usually a straightforward pair of panels plus a small cloud.
A living room used for stereo listening is harder because furniture and asymmetric wall openings break the symmetry that studios enjoy. Run the mirror trick exactly as in a studio, but expect the two side points to sit at different distances from your seat if the sofa is not centred between the speakers. Treating only one side, or treating both at mismatched distances, leaves the image lopsided.
An office with a desk-based near-field setup has a shorter listening distance, which pushes reflection points closer to the speakers and often onto the desk itself rather than the side walls. In these rooms the desk reflection and ceiling point often matter more than the side walls, simply because the geometry is so tight. Checking the desk with a small mirror, as described earlier, becomes the priority step rather than an afterthought.
In every room type, the method stays the same: locate with a mirror, confirm with the measurement targets already covered, then treat the surfaces that actually show a problem rather than treating everything on principle.
How furniture and layout change your reflection points and results
Moving a sofa, adding a rug or repositioning a desk shifts every first reflection point in the room, because the geometry that the mirror trick traces depends entirely on where your ears and the speakers sit relative to each wall. A layout change after treatment means the mirror trick needs repeating, not just a glance to confirm the panels still look right.
Soft furniture helps indirectly. A thick rug reduces floor bounce, and heavy curtains can take some energy out of a rear wall reflection, but neither replaces a correctly sized absorber at the actual marked point. Bookshelves and glass cabinets near a first reflection point tend to make things worse, since hard, irregular surfaces scatter sound in ways that are difficult to predict and measure.
Open-plan rooms with no clear side walls near the listening position are the trickiest layout. Here, the first reflection might come from a half-height partition, a kitchen island, or even a large television rather than a flat wall, and the mirror trick still works if you treat any hard surface in the geometric path as a candidate point to check.
The practical approach is to treat furniture placement as part of the acoustic plan rather than something decided first and worked around later. Settling on speaker and seating positions before buying panels avoids measuring and treating a layout you are about to change anyway.
Absorption versus diffusion at the first reflection point
Absorption removes energy from a reflection; diffusion spreads that same energy across time and direction without removing it. At a first reflection point, inside that critical 10 to 20 millisecond window, spreading the energy out does not solve the imaging problem the way removing it does, which is why absorption is the standard first move at these specific points.
Diffusion has a real role in a treated room, just not at the first reflection point itself. Once the early reflections are absorbed and bass trapping is sorted, diffusers on the rear wall or other secondary surfaces can keep a room from sounding dead while avoiding further early-arrival problems. Using a diffuser at a first reflection point instead of an absorber is one of the most common mistakes in home treatment, often chosen because diffusers look more deliberate on a wall than a flat absorber panel.
If you are only treating one or two points to start, choose absorption at the side walls and ceiling first. Save diffusion for later, once measurement shows the early window is already under control and you are refining the room’s overall character rather than fixing a specific imaging fault.
Budgeting for first reflection treatment at home or in a studio
A minimal domestic treatment plan, covering two side wall points and one ceiling point, needs three absorber panels of a reasonable size. At £29.99 per panel for a standard finish, that is well under £100 before considering a desk absorber, and the Ultra Low Cost Acoustic Panels line brings the per-panel cost down further for readers treating several points on a tight budget.
Commercial spaces, such as a listening room in a design studio or a small post-production suite, usually need more coverage: side walls, ceiling, rear wall and sometimes a secondary listening position, which multiplies the panel count accordingly. Larger format panels reduce the number of pieces needed per point, which can simplify both the budget and the installation.
Where appearance matters as much as performance, decorative finishes such as marble-effect or fluted wood panels cost more per panel than a plain absorber but still provide genuine broadband absorption at the point they cover, so the budget trade-off is aesthetic rather than acoustic. Requesting a sample before committing to a full order is a low-cost way to check finish and thickness against a specific room before spending on a complete set.
What installations actually reveal about reflection treatment
Acoustic wall panels are commonly used in residential and commercial spaces, and the pattern across listening room installations is consistent: once the first reflection points are properly covered, stereo imaging tightens and transients sound noticeably cleaner, because the early reflections that were blurring the direct sound are no longer reaching the ears at a problematic level. Readers planning their own room should treat measurement as the final check, not a formality, since it confirms whether a given panel and position actually solved the problem it was bought for.
— Tayyy
Which panels suit side wall, ceiling and desk treatment
Once you have marked your first reflection points and confirmed them with measurement, the panel choice comes down to surface and finish rather than guesswork. For side wall and ceiling coverage, the White Acoustic Wall Panel, 240 x 60cm gives full coverage of a typical reflection point in one piece, and the same size is available in a White Marble finish or a Gold and White Marble finish where the room’s look matters as much as the room’s sound.

- For a decorative desk or rear wall treatment with some absorption, the Flexible Walnut Fluted Wall Panel, 240cm x 60cm set of two works well against a flat wall section.
- Narrower first reflection points suit the Premium Wide Dove Grey Coloured Wall Panel, 240cm x 30cm set of two or its Gold equivalent for staggered or partial coverage.
- The WPC 3D Wave panels in Walnut or Light Oak suit rooms where a textured, decorative finish is the priority alongside some diffusion once your absorption is already in place.
Ordering a sample first lets you check thickness and finish against your own wall before committing to a full set, and our team is reachable on WhatsApp for quick advice on which size suits your marked points. Panels with a one-year warranty are available, so you can treat your room with confidence and start measuring the difference straight away. Browse the full acoustic wall panel range to get started.
FAQ
What are the two primary types of acoustic treatments?
The two primary types are absorption, which removes sound energy from a reflection, and diffusion, which scatters that energy across time and direction instead of removing it. At first reflection points, absorption is the standard choice, while diffusion suits secondary surfaces once early reflections are controlled.
What is early reflection?
An early reflection is sound that bounces off a nearby surface, such as a side wall or ceiling, and reaches your ears shortly after the direct sound from the speaker. Reflections arriving within the first 10 milliseconds have the greatest effect on stereo imaging, while those arriving up to 20 milliseconds still influence tonal balance.
How do I find my room’s reflection points?
Sit in your listening position and have someone slide a mirror along each side wall, the ceiling and the rear wall; wherever you see the speaker’s driver reflected in the mirror is a first reflection point. This mirror trick traces the same geometry used by image-source acoustic modelling tools, so it gives an exact result without any equipment.
What is the 38% rule in room acoustics?
This is a general placement guideline rather than a fixed standard, and measurement is still the best way to confirm whether a given position works in a specific room.
Sources
- Early Reflections 101: The first 10 milliseconds that make-or-break stereo imaging
- First reflection points — critical placement | Critical Listening Lab
- First reflection point calculator for home theatres
Recommended
- Echo vs Reverb for Musicians: The 50ms Rule and Mix Settings
- Apartment Echo: Cheap Fixes First, Sample Panels Later
- How to Compare Acoustic Panel Samples at Home
- Start with a ceiling cloud, then corners: UK home acoustic…
Ready to compare products? Shop waterproof marble wall sheets Shop flexible wood wall panels